Yoga is growing in popularity across the world, but not many people have a comprehensive understanding about this ancient practice. Yoga originated in India. It is a non-sectarian physical, mental, and spiritual practice.
Yoga is not just about quickly transitioning from one pose to another – there is a lot more to it than that.
Consider the following verse from the chapter on Dhyana Yoga in the Bhagavad Gita.
nātyaśhnatastuyogo ’stinachaikāntamanaśhnataḥ
nachāti-svapna-śhīlasyajāgratonaivachārjuna
O Arjun, those who eat too much or eat too little, sleep too much or too little, cannot attain success in Yoga.
Bhagavad Gita 6:16
The verse talks about the importance of eating and sleeping in moderation. Physical Yoga exercises are great, but that alone will not suffice. For Yoga to be holistic and effective, pair it with proper eating habits and sleep instead of just blindly performing the poses. The true spirit and power of Yoga will manifest only when you practice it the right way.
Many people practice Yoga sporadically. They miss regular practice and instead overcompensate with an intense workout the next day. This sort of inconsistency does more harm than good. Does it mean that you have to practice even when you don’t feel well? No, that’s not what consistent practice means. The thing to remember is that small activities done regularly and consistently give better results than intermittent high intensity workouts.
Even when you do a short routine, you must have a sense of body discipline to ensure that you do only the postures that your body can handle at the time. This may sometimes just involve simply sitting with your mind focused on your breathing, and without being overwhelmed by the noise of your inner thoughts. Focused breathing is an observation-oriented exercise which is powerful, and it can give you more energy than an intense workout which your body may not be ready for when ill.
vyadhistyanasamshayapramadaalasyaaviratibhranti-darshanaalabdhabhumikatvaanavasthitatvachittavikshepateantarayah
Disease, mental inaction doubt, carelessness, laziness, lack of volition, illusion, inconsistency, inability to maintain focus on a goal, and inability to remain grounded are the obstacles to yoga.
Yoga Sutra 1:30
When you start practising Yoga, you will naturally encounter the obstacles mentioned in the verse above. To overcome these, you need to work with a qualified practitioner – physician, psychiatrist, counselor, guru and/or a therapist.
Yoga for post-pregnancy weight loss
Yoga is an excellent choice for shedding your post-pregnancy weight. New mothers may not be able to do intense workouts, but there are Yoga practices that can be performed even during the first few weeks after delivery.
During the first six weeks post-partum, while still nursing your newborn, start by strengthening your core and pelvic floor muscles. Gentle asanas, selected in consultation with a doctor, can aid gradual weight loss and bring your body back to the pre-pregnancy state.
An important factor to consider while practicing Yoga post-partum is the muscle strength before and during the pregnancy. In case you have been relatively inactive before and during the pregnancy, don’t jump straight into all the poses. Take time to evaluate your muscle strength and do only what you can. Start gentle practice with the help of a Yoga practitioner who specializes in post-natal yoga, and soon you will progress to poses that previously seemed impossible.
Effective practice of asanas
Asanas, when practiced with proper anatomical alignment using breathing, clutching (bandhas) and gaze (drishti), have numerous benefits. Even Yoga novices can excel in doing bandhas and drishti when they have mastered alignment and breath control.
Let’s call these steps as the ABCD of asana practice – Alignment, Breathing, Clutching, and Drishti.
Here are some Yoga poses that you can integrate into your regular practice, and gradually witness your body achieve the desired weight and health benefits.
1. Tadasana (Mountain Pose)
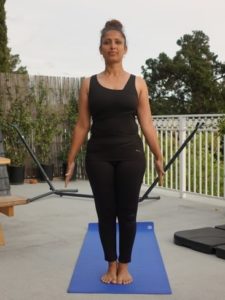
Fig 1: Tadasana (Mountain pose)
Tadasana (Fig 1), also called the mountain pose, is the foundational or neutral pose to maintain while performing standing poses such as Vrikshasana, Natrajasana, etc. In order to get into Tadasana, stand with your weight evenly distributed between both feet. Ensure that the arch is properly maintained and not collapsed. Using the support of the front of your thighs (quadriceps), pull up your knee caps and tuck your stomach in. All three bandhas – Mula bandha, Uddiyana bandha and Jalandhara bandha can be engaged during the asana. Drishti can be focused on the nose.
In the book Light on Yoga, author BKS Iyengar mentions that if individuals are mindful of their posture and engage the whole body like in Tadasana, they can minimize flab around their abdomen.
2. Uttanasana (Standing Forward Bend)
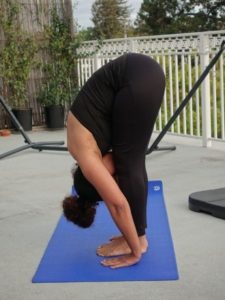
Fig 2: Uttanasana (Standing Forward Bend)
Uttanasana (Fig 2), or the standing forward bend, is also called Padahastasana. Exhale as you get into Uttanasana. This pose stretches the hamstrings. If you have tight hamstrings, you may not be able to touch the ground with your hands. That’s alright. Try bending the knees a little to avoid overextension – stretch only as far as you can. With continuous practice, the hamstrings will develop more elasticity, allowing you to reach further down.
Inhale as you rise to Tadasana. Maintain drishti between the eye brows. Since Uttanasana works on the largest muscles and the spine, the influence it has on managing weight is tremendous.
The pose allows for relaxation and can help deal with depression. However, Uttanasana is not to be practiced by individuals with spinal injuries and high or low blood pressure.
3. Ashwa Sanchalanasana (Horse Pose)
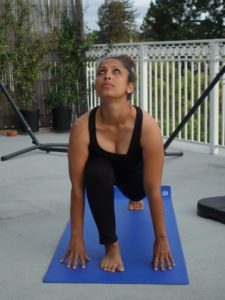
Fig 3: Ashwa Sanchalanasana
Move into Ashwa Sanchalanasana (Fig 3) from Uttanasana by inhaling and moving a leg back or from Adho Mukha Svanasana (downward dog pose) by inhaling and moving a leg forward. The drishti is between the eye brows.
If you are engaged in a profession that requires you to be seated for extended periods of time, you may develop tight hamstrings that prevent the foot from being aligned with the hands. If that is the case, work on your muscle elasticity gradually, don’t force yourself into poses that you cannot handle. Also, if you’ve had ever knee or neck injuries, be careful as you assume the pose and attempt it only if your body is able to handle it.
There are many variations for Ashwa Sanchalanasana that you can practice. You may place the foot outside the hand on the same side, or touch the forehead to the floor while in Ashwa Sanchalanasana. These variations depend on the flexibility of your body. There is no need to force anything – do only those you can.
4. Malasana (Garland Pose)
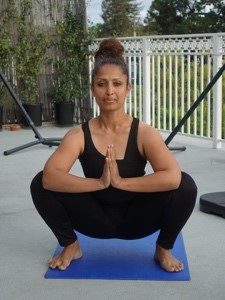
Fig 4: Malasana
Malasana (Fig 4) opens out your inner thighs and the groin. Use your elbows to push your knees back. If the inner thighs are not very flexible, you may find it hard to open them out. Work on opening them ever so gradually. The drishti is on the nose. Pay attention to maintaining balance and be very careful while practicing the pose.
Consult with your doctor to know if you can practice Malasana, especially if you have had a lower back or knee injury.
5. Chamatkarasana (Wild Thing Pose)
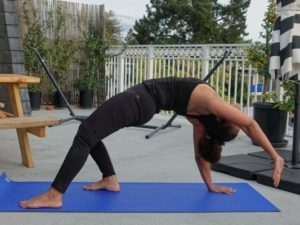
Fig 5: Chamatkarasana
Chamatkarasana (Fig 4), also called the wild thing pose, works on a wide range of muscles all at once.
Get into Chamatkarasana by starting at downward dog pose. Lift the right foot to the ceiling into three-legged dog pose, and carefully place the right foot on your left side while your chest points at the ceiling. Drishti is between the eye brows. If you can, try to balance with only your left hand while the right hand is stretched backward.
Avoid the pose if you have carpal tunnel syndrome or rotator cuff injuries.
6. Parsvakonasana (Extended Side Angle Pose)
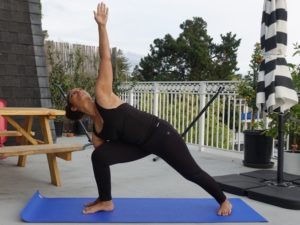
Fig 6: Parsvakonasana
There are many ways to get into Parsvakonasana (Fig 6) which is also called the extended side angle pose.
Here is how you can get into it from the horse pose. The right foot is forward in the horse pose. Turn the back leg to form a sixty degree angle with the axis connecting the heel of the front leg to the arch of the back leg. Place your right hand next to the right foot. You may use a brick if your hand can’t reach the ground while the pelvis is not turned. Lift the left hand up to the ceiling and look at your left thumb (unless you have neck injuries or high blood pressure).
Be careful in case of knee injuries.
7. Wide-legged Utkatasana (Chair Pose)
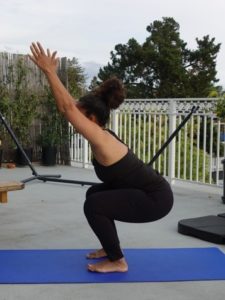
Fig 7: Utkatasana
Utkatasana (Fig 7) is a standing pose, also known as the chair pose or fierce pose. To get into Utkatasana, exhale and lower your buttocks so that your thighs are parallel to the ground, ensuring your knees stay behind the toe line.
In this pose, you engage a range of muscles like the thighs, core, and hamstrings. Individuals who have a tough time staying in the pose due to weak muscles can use the wall for support. Be careful to place the foot firmly on the ground with the arch maintained so that the pronation or supination doesn’t impact the quality of the posture.
In the original chair pose, the feet are placed next to each other but to open up the groin muscles, it helps to place the feet shoulder width apart.
8. Kaliasana (Goddess Pose)
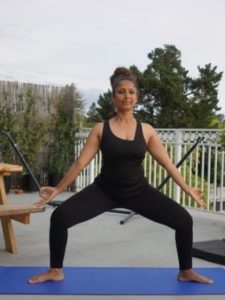
Fig 8: Kaliasana
Kaliasana (Fig 8) is commonly referred to as the goddess pose. It not only works your inner and outer thighs, but also opens up the groin muscles and works on toning a major muscle group.
The pose is known to activate the Svadisthana chakra, unleashing creativity and emotions. Tapping into your emotions, you can unlock new insights particularly in situations where you may have hit a wall.
There are several variations you can attempt for Kaliasana such as keeping the hands on your knees or close to your knees, lifting your hands to the ceiling, joining your hands in front of your chest, placing one hand on the knee and stretching the other hand to the ceiling and alternating side, etc. The drishti needs to be maintained on the tip of the nose.
9. Janu Shirshasana (Sideways Head to Knee Pose)
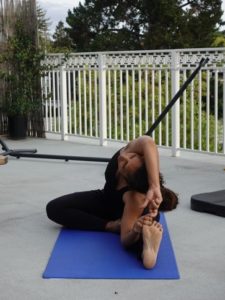
Fig 9: Janu Shirsasana
Janu Shirsasana (Fig 9) is also known as the sideways head to knee pose. It stretches your sides, hamstrings and inner thighs.
From Dandasana, stretch your right leg to the right along the length of the mat and place your left sole on the inner right thigh. Exhaling, gradually draw your chest to the upper thighs, reaching for your toes. Your hand may not reach the toes if you do not have sufficient flexibility yet. That is alright. Reach only as far as you can and slowly work on improving your flexibility.
After you gain sufficient flexibility, you will be able to turn your left side up to the ceiling to further increase the stretch. If you are very flexible, the goal is to gradually develop the strength to hold the pose for longer periods of time.
10. Marichiasana (Marichi’s Pose)
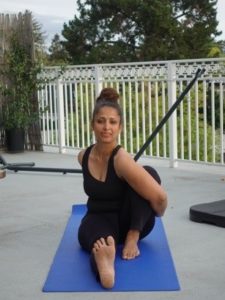
Fig 10: Marichiasana
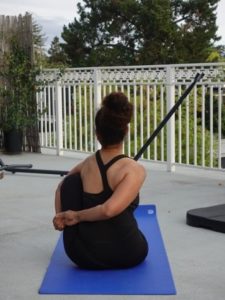
Marichiasana (Fig 10) is also called the pose dedicated to sage Marichi.
From Dandasana, fold the right leg and envelope your right knee with the right hand trying to grab the left hand as it reaches from behind your back. A band can be used if your chest and shoulders don’t open up enough to allow for the hands to reach each other to form a lock.
Do not attempt this pose if you have ankle injuries.
11. Baddakonasana (Cobbler Pose)
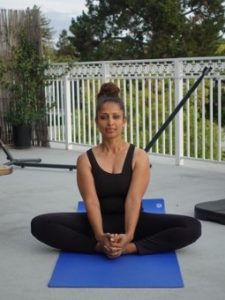
Fig 11: Baddakonasana
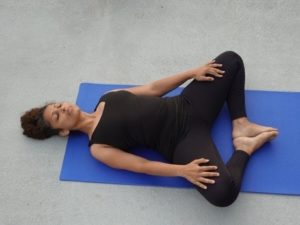
Baddakonasana (Fig 11) is also called the cobbler pose or the bound-angle pose.
If you have tight hamstrings or a stiff back, you may not be able to straighten the torso in this pose. But this gradually improves with muscle flexibility, and soon you will be ready to straighten the torso. Tight inner thighs can prevent knees from touching the ground. Again, as flexibility improves, you will see the knees inching closer to the ground. When you lie down in the pose, it is called Supta Baddakonasana.
12. Matsyasana (Fish Pose)
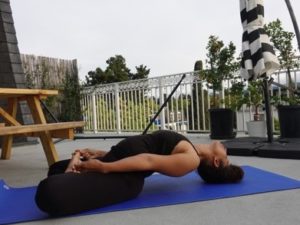
Fig 12: Matsyasana
Matsyasana (Fig 12) is also called the fish pose and is considered very therapeutic. When practiced right, it is even known to heal knee injuries. When practising this asana, keep the legs straight instead of Padmasana.
Perform various smooth transitions between poses progressively holding each pose for more breaths or added repetitions to explore your body and mind more intimately.
People with neck injuries, high or low blood pressure, migraine and insomnia should avoid Matsyasana.
Note: Inversions are to be avoided during menstruation.
Success in weight loss through Yoga
Consider this verse from Hatha Yoga Pradipika by Svatmarama.
“Perfection of hatha yoga is achieved when there is leanness of the body, tranquil countenance, manifestation of the inner sound, clear eyes, diseaselessness, control of bindu, active digestive fire and purification of nadis.” II:78
Consistency and perseverance are pre-requisites for success in Yogic practice. The key is intentional and patient practice even when you may not see the kilos dropping on the weighing scale.
Gradual progress, and not intense or inconsistent practice, is the mark of a mature practitioner. Weight loss will be one of the signs of a successful practice, but it shouldn’t be your goal. You will also notice other physical and mental benefits such as improved cognitive function, more mindfulness, increased resilience etc., just to name a few.
So keep practising Yoga, don’t over-exert, and seek the counsel of a practitioner. Not only will you lose weight, but you will also gain a multitude of other physical, mental, and emotional benefits as well.
Edited by Nisha Salim
